
This troubleshooting guide is for Diamond overhead bifold doors from 2015 and newer. For older door models, please contact our service department directly at (866) 325-7600 or by emailing service@diamonddoors.com for assistance.
Diamond Doors designs and manufactures each bifold door with careful attention to quality and reliability. However, you may still find times when you need to troubleshoot issues that arise with your overhead bifold door. To make it easier, we’ve designed a circuit board with onboard diagnostics. This blog post will walk you through the process to figure out what went wrong, and the steps you can take to resolve it.
- My PWR light is off
- My bifold door won’t open
- My bifold door won’t close
- My bifold door won’t unlock
- My bifold door won’t lock
- My remotes are not working
- My bifold door won’t open (or close) all the way
There are many variables and unfortunately we can’t cover all of them here. If you have additional questions, or these troubleshooting steps don’t resolve the issue with your bifold door, please contact our service department. They are available from 8 am to 5 pm CST at (866) 325-7600 from Monday to Friday. For emergencies that arise after hours, please contact our emergency line at (216) 677-3667.
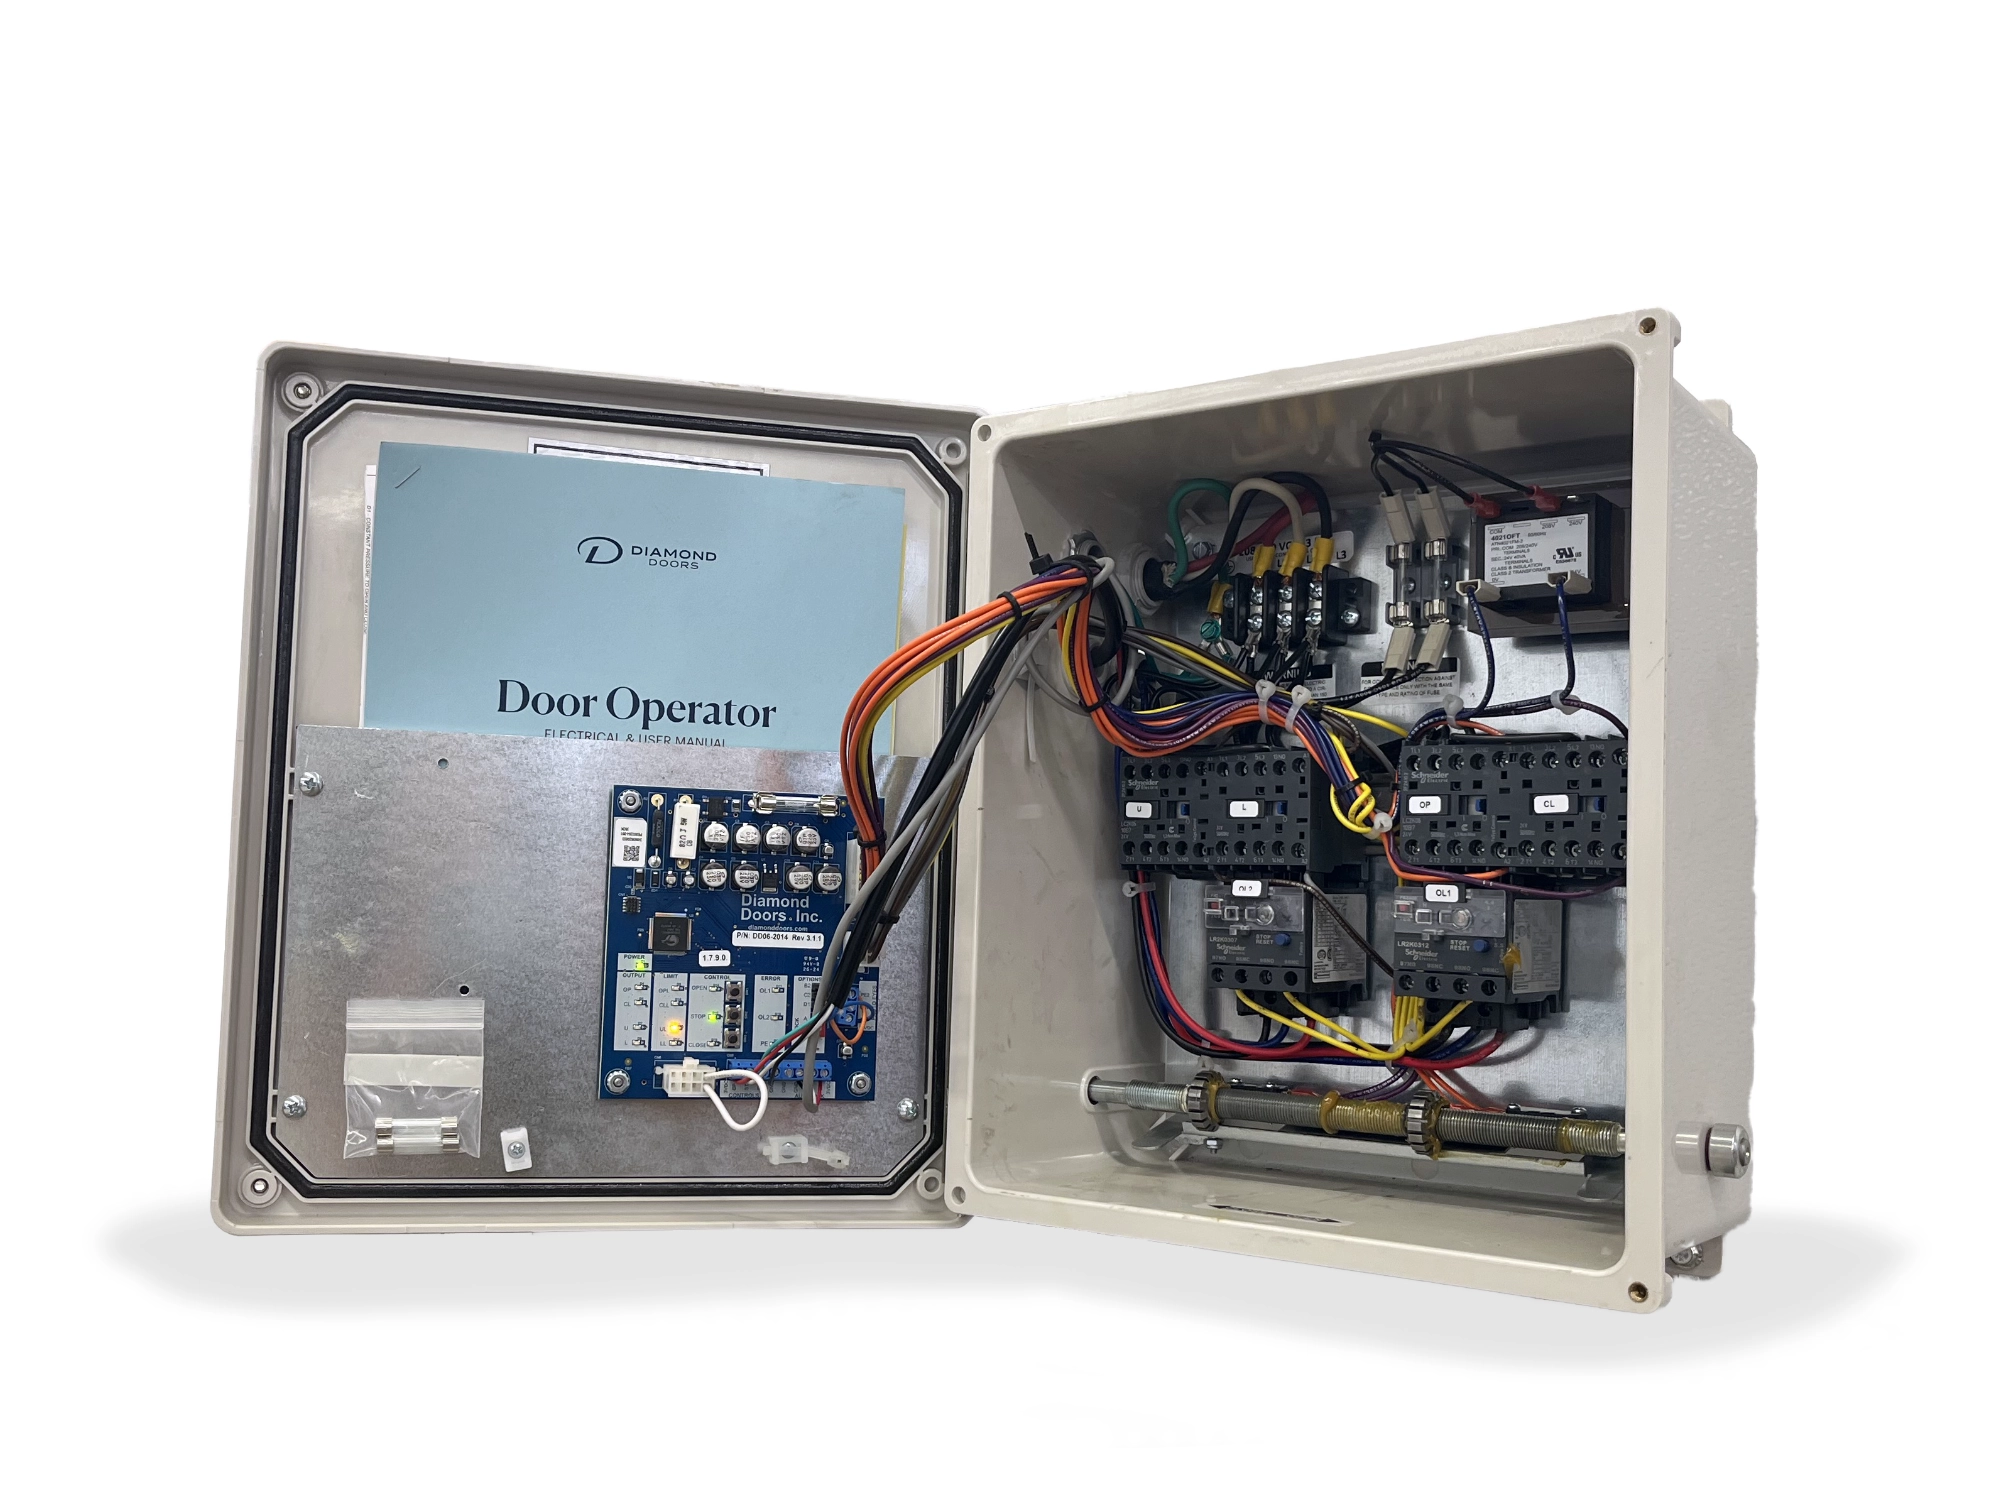
The Diamond Doors Circuit Board
A Diamond Doors circuit board is designed for easy onboard diagnostics. When the door is in proper working condition, the following lights should be on.
- The PWR light – indicates that there is power to the door.
- The STOP light – indicates a complete electrical circuit.
Other lights may be on depending on the position of your door and the door options that you selected with your door package.
My PWR Light is Off
Troubleshooting Steps
- Check for tripped breakers on your building’s electrical panel.
- After confirming that it is safe to do so, flip the breaker back to the ON position.
- If the light is still off, check for blown fuses in your door’s electrical box. There are three fuses – one on the circuit board and two next to your high voltage wires inside the box.
- If any fuses are blown, replace them with the extra fuses (500mA) located inside the door’s electrical box. Call our service department for additional fuses and for assistance troubleshooting the cause of the blown fuse.
Overview
Check for tripped breakers on your building’s electrical panel. After confirming that it is safe to do so, move the tripped breaker to the ON position.
Also check for blown fuses in your door’s electrical box. There are three fuses – one on the circuit board and two next to your high voltage wires inside the box. Diamond Doors provides replacement fuses with your door, located inside your electrical box. Replace the fuses and check if the PWR light turns on.
If you find any blown fuses, this is an indication that there may be something else wrong with your door. Please call our service department for replacement fuses (500mA) and for additional help troubleshooting the cause of the blown fuse.

My STOP Light is Off
Troubleshooting Steps
- Check the white wire that runs from the up/down/stop controller, through the door’s junction box, to the blue terminal strip at the bottom of the door’s circuit board.
- Check for any loose or disconnected wiring.
- Repair any loose or disconnected wiring.
- If the light is still off, please contact the Diamond Doors service department for further assistance.
Overview
The STOP light on your circuit board completes the electrical circuit for your door. When this circuit is broken and the STOP light turns off, the door will not operate. If the door is moving, it will stop the movement of the door.
My Bifold Door Won’t Open
There are a few possible reasons why your overhead bifold door won’t open. One possible reason is that there is no power to your building. However, other causes may include a lack of power to the door itself, faulty or incorrectly set limit switches, an issue with the up/down/stop controller, or insufficient voltage to your door. Here’s how to diagnose and resolve these issues.
No Power to the Door
Troubleshooting Steps
- Check the PWR light, located on the bifold door’s circuit board.
- If the PWR light is ON, there is power to your door.
- If the light is off, check for tripped breakers on your building’s electrical panel.
- After confirming that it is safe to operate, flip the breaker back to the ON position.
- If the light is still off, check for blown fuses in your door’s electrical box. There are three fuses – one on the circuit board and two next to your high voltage wires inside the box.
- If any fuses are blown, replace them with the extra fuses (500mA) located inside the door’s electrical box. Call our service department for additional fuses and for assistance troubleshooting the cause of the blown fuse.
Overview
If you have verified that there is power to your building, the next step is to verify that there is power to your door. Check the PWR light, located on the bifold door’s circuit board inside the electrical box. If there is power to your door, the light will go on. If it is not on, check for tripped breakers on your building’s electrical panel, or blown fuses in your door’s electrical box.
There are three fuses inside your electrical box – one fuse on the circuit board, and two fuses located near the high voltage wires inside your box.
We provide replacement fuses with your door, located inside your electrical box. Replace the fuses and check if the PWR light turns on.
If you find any blown fuses, this is an indication that there may be something else wrong with your door. Please call our service department for replacement fuses (500mA) and for additional help troubleshooting the cause of the blown fuse.

Faulty or Incorrectly Set Limit Switches
Troubleshooting Steps
- Check that the following lights on your door are ON: PWR, STOP, and UL.
- If the UL light is off, continue with the steps below.
- For manually locking doors, ensure that the locking handle is firmly in the locking handle cradle, compressing the safety switch.
- For autolocking doors, listen for the sound of the autolock motor.
- If the motor runs, check if the locking fingers are released from the locking catches and parallel to the door. If the locking fingers are engaged, please contact our service department for further assistance.
- If the motor does not run, check that the autolock has power.
Overview
To ensure that the limit switches are working as intended, you will need to check the UL light on your circuit board. Without this light, your door will not open, as the door believes it is still locked.
First, locate the UL light on the circuit board inside your bifold door’s electrical box. If the UL light is not on, here are a few simple things to help troubleshoot the issue.
For doors with a single lever locking system (also known as the manual lock), ensure that the locking handle is firmly in the locking handle cradle. The handle should fully compress the safety switch.
For overhead bifold doors with autolocking systems, make sure that the autolock has fully cycled and is not stuck somewhere in the middle. To check this, ensure that the locking fingers are fully released from the locking catches and are parallel to the door. If the locking fingers are engaged or misaligned, contact our service department for assistance.
If the autolock motor does not run, ensure that it has power.
Up/Down/Stop Controller Fault
Troubleshooting Steps
- Check that the following lights on your door are ON: PWR and STOP.
- Check the door controller and appropriate wires for loose connections or damaged wires.
- Repair any loose connections or damaged wires.
- If the issue continues, see the section called “My Bifold Door Won’t Unlock” for further troubleshooting.
Overview
If your door operates intermittently and/or the motor does not respond when you use the up/down/stop controller, there may be an issue with your up/down/stop controller. To troubleshoot this issue, you will need to access your door’s circuit board.
Check for the STOP light on your circuit board. It should be ON. This light completes the electrical circuit for your door. If it is not on, the door will not operate. Refer to our STOP light section for further information. The UP and DOWN lights will only turn on while the corresponding up/down/stop controller buttons are pressed.
Check the up/down/stop controller and the appropriate wires for loose connections or damaged wires.
Insufficient Voltage to the Door
Insufficient voltage to the door is characterized by a door that does not run at all, or only runs intermittently. The motor will engage when the door controller is used, but will only hum and will not operate the door. Use of the remote control makes no difference.
Troubleshooting Steps
- Check the breakers on your building’s electrical panel.
- Check the thermal overloads in the door’s electrical box to see if they have released.
- If they have released, they will automatically reset within 30 seconds. However, you will need to continue troubleshooting for insufficient voltage.
- Check that the correct wire gauge was used when wiring your building for your bifold door.
- Please confirm the recommended wire gauge using our wire size chart.
- If the wrong wire size was used in your building, you will need to have it replaced with the correct wire size.
- For any concerns regarding your motor, please contact our service department.
Overview
If your door works intermittently, or has recently stopped working altogether, you may be dealing with insufficient voltage to the door. You may also have noticed your door motor humming when you press the open button.
First, check the breakers on your building’s electrical panel to ensure that they have not tripped. Also check the thermal overloads in the door’s electrical box to see if they have released. If they have released, they will automatically reset within 30 seconds. However, you will need to continue troubleshooting for insufficient voltage, as repeated use of a door with insufficient voltage will damage the door’s motor.
Check that your building contractor used the correct wire gauge when wiring your building for your overhead bifold door. Diamond Doors provides the minimum required wire gauge on your door quote as well as in the electrical manual provided with your bifold door.
For quick reference, here is an online version of our wire size chart.
To confirm that the appropriate wire size was used (according to the Diamond Doors’ wiring chart), please contact your electrician.
Why does wire size matter?
Diamond Doors utilizes a brake motor for the door’s lifting system. This is a secondary safety that prevents the door from inching down case of a power failure while the door is in the open position. However, due to the design of our brake motors, it draws a significant inrush of current in the first few seconds to run the motor and simultaneously release the brake.
If the wire that is powering the door is undersized, it will cause a significant voltage drop. The brake will not release, and the motor becomes overloaded (and overheated). While we have implemented thermal overloads in our electrical system to protect the motor, repeatedly operating the door and tripping the overloads will damage the motor and prevent it from working altogether.
By providing the correct wire size, the voltage drop is lessened. This decreases the amperage spike and helps prevent damage to the motor.

My Bifold Door Won’t Close
If your overhead bifold door is stuck open and there is power to your door, there are a few things you can try to troubleshoot the issue. If your door is not closing, the first thing to check is the operation of the photo eyes.
Emergency Close Procedure
If your photo eyes are not working, use the emergency close procedure to lower your door. Press the down button five times. On the fifth time, hold the down button until the door closes completely. It will take a few seconds before the door begins to move.
The timing of the emergency close procedure is sensitive. Consistency and speed are necessary. Please contact our service department for help with this procedure before continuing.
If this does not work after several tries, the issue is likely not related to your photo eyes. There may be a damaged wire or loose connections. Use the emergency manual operation to lower your overhead bifold door for continued troubleshooting.
Photo Eyes are Blocked or Not Aligned
Troubleshooting Steps
Note: While checking to ensure that your photo eyes are aligned, be careful not to stand in the way and interfere with their line of sight.
Note: Direct sunlight can interfere with the operation of your photo eyes. Try creating a shield from the sun or setting the photo eyes further into the building to avoid this issue.
- Check that there is nothing blocking the sight of the photo eyes.
- Check that your photo eyes have power. There should be a green light on both eyes.
- Ensure that the photo eyes are aligned.
- If they are aligned, one of the photo eyes will have a yellow light.
- If they are NOT aligned, use the top screw on the photo eye mounting bracket to adjust the photo eyes until the light comes on.
Overview
Check your doorway to make sure that there is nothing between your photo eyes. You should also check that the photo eyes are aligned.
Both eyes will have a green light that indicates power. If either of these lights are not on, ensure that there is power to your door and that there are no lose or broken wires to your photo eyes.
One of the eyes will also have an amber or yellow light. If this light is not on, use the top screw on the photo eye mounting bracket to tilt the photo eyes until they align and the light comes on.
Note
Direct sunlight can interfere with the operation of your photo eyes. If you are finding it difficult to align the photo eyes, try shielding the eyes from the sun. If this is successful, you may need a permanent shield for the photo eyes to work reliably.
Up/Down/Stop Controller Fault – For New Doors
Troubleshooting Steps
- Turn off the power to the door at the building’s breaker panel.
- Move the black jumper on the door’s circuit board from C2 to B2.
- Turn on the power to the door.
- If this does not resolve the issue with your up/down/stop controller, refer to the troubleshooting steps for existing doors below.
Overview
All Diamond doors are shipped with the black jumper in the C2 position on the circuit board. This enables push button operation for the door to open, but requires you to push and hold the button while the door is closing.
If you are troubleshooting your new overhead bifold door, you will need to turn off the power to the door at the building’s electrical panel. Then move the black jumper to the B2 position in the options column of the circuit board. This enables push button operation while the door is opening and closing.
Turn on the power to the door, then use the steps in the section above to align your photo eyes.

Up/Down/Stop Controller Fault – For Existing Doors
Troubleshooting Steps
- Check that there is power to your door. The PWR light should be on. If it is off, refer to our PWR light section.
- Check that the STOP light is on. If it is off, please refer to our STOP light section.
- If the issue is intermittent (the door only operates some of the time), check the controller and appropriate wires for loose connections or damaged wires.
Overview
If your door operates intermittently and the motor does not respond when you use the up/down/stop controller, there may be an issue with your up/down/stop controller. To troubleshoot this issue, you will need to access your door’s circuit board.
Check for the STOP light on your circuit board. It should be ON. This light completes the electrical circuit for your door. If it is not on, the door will not operate. Refer to our STOP light section for further information. The UP and DOWN lights will only turn on while the corresponding up/down/stop controller buttons are pressed.
Check the up/down/stop controller and the appropriate wires for loose connections or damaged wires.
Safety Switch – For Manual Lock Doors
Troubleshooting Steps
- Ensure the locking handle is firmly in its cradle and compressing the safety switch.
- Check that the UL light is ON.
- If the switch is fully compressed but the UL light does not come on, please contact our service department for further assistance.
Overview
For the door to operate, the UL light must be ON. (This indicates to the door that it is unlocked and ready to operate.)
If the UL light is off, you will need to make sure that the locking handle is firmly in its cradle and pressing the safety switch. If the switch is fully compressed but the UL does not come on, there may be an issue with the safety switch itself or faulty wiring. Please contact our service department for further assistance.
Missing or Damaged Photo Eyes
Troubleshooting Steps
- Check to ensure both photo eyes are installed near the base of your door and are not damaged. If you are missing photo eyes, or they have been damaged, you will need to change the door’s settings.
- Turn off power to the door at the building’s breaker panel.
- Move the black jumper from B2 to C2 on the door’s circuit board.
- Turn on power to the door.
- Push and hold the down button to close the door.
- Contact the Diamond Doors service team for replacement photo eyes.
Overview
Diamond doors are equipped with a push and hold setting for bifold doors with missing or damaged photo eyes. This ensures the safety of personnel and equipment.
Upon door installation, and when equipped with photo eyes, the switch is changed to single push button operation for opening and closing the door. However, if the photo eyes are damaged or missing, this feature will not work.
As a temporary measure, you can change the door settings on the circuit board.
First, turn off power to the door at the building’s breaker panel. Then move the black jumper to the C2 position on the circuit board. This will allow the door to close while the down button is held.
Turn on the power to the door, and be sure to contact the Diamond Doors service team for replacement photo eyes as soon as possible.
All Diamond doors are shipped with the black jumper in the C2 position on the circuit board. This enables push button operation for the door to open, but requires the down button to be pushed and held while the door is closing.
My Bifold Door Won’t Unlock
If you have an electric autolock included with your bifold door, it should automatically cycle when you push the open (or close) button on your overhead bifold door. If your autolock system is not working, here is what you can do to troubleshoot and fix the issue.
No Power to the Door
Troubleshooting Steps
- Check the PWR light, located on the bifold door’s circuit board.
- If the PWR light is ON, there is power to your door.
- If the light is off, check for tripped breakers on your building’s electrical panel.
- After confirming that it is safe to do so, flip the breaker back to the ON position.
- If the light is still off, check for blown fuses in your door’s electrical box.
- If any fuses have blown, replace them with the extra fuses located inside the door’s electrical box. Call our service department for additional fuses and for assistance troubleshooting the cause of the blown fuse.
Overview
If you have verified that there is power to your building, the next step is to verify that there is power to your door. Check the PWR light, located on the bifold door’s circuit board inside the electrical box. If there is power to your door, the light will go on. If it is not on, check for tripped breakers on your building’s electrical panel, or blown fuses in your door’s electrical box.
We provide replacement fuses with your door, located inside your electrical box. Replace the fuses and check if the PWR light turns on.
If you find any blown fuses, this is an indication that there may be something else wrong with your door. Please call our service department for replacement fuses (500mA) and for additional help troubleshooting the cause of the blown fuse.
Incorrect Circuit Board Switch Position
Troubleshooting Steps
- Locate the red lock switch, found on the bifold door’s circuit board.
- For manually locking doors, ensure it is in the DOWN position.
- For autolocking doors, ensure it is in the UP position.
Overview
Check that the lock switch position is correct.
This is a red switch located on the door’s circuit board in the electrical box. It should be in the UP position for autolocking bifold doors, and in the DOWN position for manually locking bifold doors.

Autolock Limit Switches Improperly Set or Faulty
Troubleshooting Steps
- Check that the door is completely closed. There should be no load on the cables and the should all have the same amount of travel.
- Check the door’s circuit board to ensure that the PWR light is on.
- If it is off, see our PWR light section.
- Check the door’s circuit board to ensure that the STOP light is on.
- If it is off, see our STOP light section.
- With the door completely closed, check the CLL light. If it is off, please contact our service department for assistance with the door’s lower limit. (Do not adjust the lower limit without consulting our service department. Failure to correctly adjust this limit could result in damage to your door.)
Overview
Next, you will need to ensure that the bifold door’s limit switches are working as designed. This is for overhead bifold doors equipped with the autolock and does not apply to manually locking doors.
There are three lights on the circuit board that should be lit up – the PWR, STOP, and CLL lights. If the PWR light is off, please refer to the No Power to the Door section of this guide. If the STOP light is off, please see the Stop Light section.
If CLL light is OFF, please contact our service department for assistance with the door’s lower limit. Failure to correctly adjust this limit could result in damage to your door.
How does it work?
The CLL (Close Limit light) which indicates that the door is fully closed, should be illuminated. If it is OFF, the door controller believes that the door is already open and that it does not need to cycle the locking system.
If your door is fully functional, both the CLL and LL lights should be on when your door is closed. This way, the door controller knows that it is fully closed and must cycle the autolock before opening. The LL light will then turn off and the UL light turn on. This indicates to the door controller that the lock is disengaged and the door can be safely opened.

My Bifold Door Won’t Lock
We design our locking systems to secure your bifold door against your building. However, if your overhead bifold door is equipped with an autolock system that is not working, here are a few troubleshooting steps.
Closed Limit Switches Improperly Set
Troubleshooting Steps
- With the door completely closed, check the CLL light. If it is off, please contact our service department for assistance with the door’s lower limit. (Do not adjust the lower limit without consulting our service department. Failure to correctly adjust this limit could result in damage to your door.)
- Use caution when operating your door, watching closely to ensure that it does not travel too far. If your door is completely closed but the door motor continues to run, use the STOP button to immediately stop your door.
Overview
First, you will need to ensure that the bifold door’s limit switches are working as designed. This is for overhead bifold doors equipped with the autolock and does not apply to manually locking doors.
The CLL light on the door’s circuit board must be ON for the autolock to cycle. This indicates to the door controller that the door is fully closed and the autolock can safely operate.
If CLL light is OFF, please contact our service department for assistance with the door’s lower limit. Failure to correctly adjust this limit could result in damage to your door.
Use caution when operating your door, watching closely to ensure it does not continue running even after it is fully closed. If it continues to run, it will eventually start to open with the cables going in the wrong direction. This can cause serious damage to your cables and driveline components. If this happens, use the STOP button to immediately stop your door.

No Power to Autolock or Autolock Motor Humming
If your CLL light is on but your autolock does not run, check for power to your autolock. You should be able to hear it operate. If there is no power, check for broken wires and lose connections.
If your autolock hums, or you can hear it run but it doesn’t move the locking fingers, please call the Diamond Doors service department for further assistance.
Incorrect Circuit Board Switch Position
Troubleshooting Steps
- Locate the red lock switch, found on the bifold door’s circuit board.
- For manually locking doors, ensure it is in the DOWN position.
- For autolocking doors, ensure it is in the UP position.
Overview
Check that the lock switch position is correct.
This is a red switch located on the door’s circuit board in the electrical box. It should be in the UP position for autolocking bifold doors, and in the DOWN position for manually locking bifold doors.
My Bifold Door Remotes are Not Working
If your bifold door opens using the up/down/stop controller but not with your remote, your remote may have become disconnected. This may occur when the batteries in your remote run out. Follow the steps below to reconnect your remote. We have included a diagram to make it easier.
Reconnect Your Remotes
- Locate your remote receiver inside the bifold door’s electrical box.
- Press and release the CH1 (OPEN) learn button on the receiver.
- Within 30 seconds, press the desired OPEN button on the remote control.
- Press and release the CH2 (CLOSE) Learn button on the receiver.
- Within 30 seconds, press the desired CLOSE button on the remote control.
- Press and release the CH3 (STOP) Learn button on the receiver.
- Within 30 seconds, press the desired STOP button on the remote control.
Note:
To erase the memory of the remote and reset the buttons, press and hold the CH Learn button for the channel that you wish to erase. Release the button when the light turns off. The memory for that button has been erased.
My Bifold Door Won’t Open All the Way
If you find that your overhead bifold door doesn’t open, you may need to adjust the limit switches in the electrical box. Do these adjustments when the door is in the closed position.
Setting the Upper Limit
We design our doors with a triangle shape when they are fully opened. It is very important to never operate your door past the designed opening height to prevent the door from becoming stuck and being damaged. Follow the steps below to set the upper limit of your bifold door.
- Mark the designed opening height of your door on your door column. (This is the highest point that the bottom of your door should reach.) You can find this information on your order acknowledgement.
- Open your bifold door, be sure to stop the door before it runs past the opening height.
- Locate the limit switches and limit nuts at the bottom of your door’s electrical box.
- Press the silver retainer plate to release the limit nuts.
- Adjust the OPEN limit switch. Make very small adjustments.
- Release the retaining plate, ensuring that BOTH limit nuts are securely latched and do not spin freely.
- Run your door, watching closely to ensure that it does not travel too far. Manually stop your door before it runs past the designed opening height.
- If your door stopped BEFORE the open height, you will need to push the top of the OPEN limit nut toward the back of the electrical box. This will allow your door to open further.
- If you stopped your door before it travelled past your open height, you will need to pull the top of the OPEN limit nut toward yourself.
- Run the door again, repeating steps 2 to 7 until the door consistently stops at the designed opening height. Make smaller adjustments as the door gets closer to the designed opening height.
Need More Help?
If you need more information than is available in this troubleshooting guide, contact our service department. They are available from 8 am to 5 pm CST at (866) 325-7600 from Monday to Friday. For emergencies that arise after hours, please contact our emergency line at (216) 677-3667.
